Do you ever find yourself missing your favorite TV shows because you’re not home to watch them live? Or perhaps you want to rewatch a crucial moment, but traditional schedules don’t align with yours. Recording live television to a USB drive is a simple, cost-effective, and empowering solution that transforms your viewing experience. With just a few steps, you can turn your TV or digital receiver into a personal video recorder, giving you control over when and how you enjoy your content.
Understanding Live TV Recording to a USB Drive
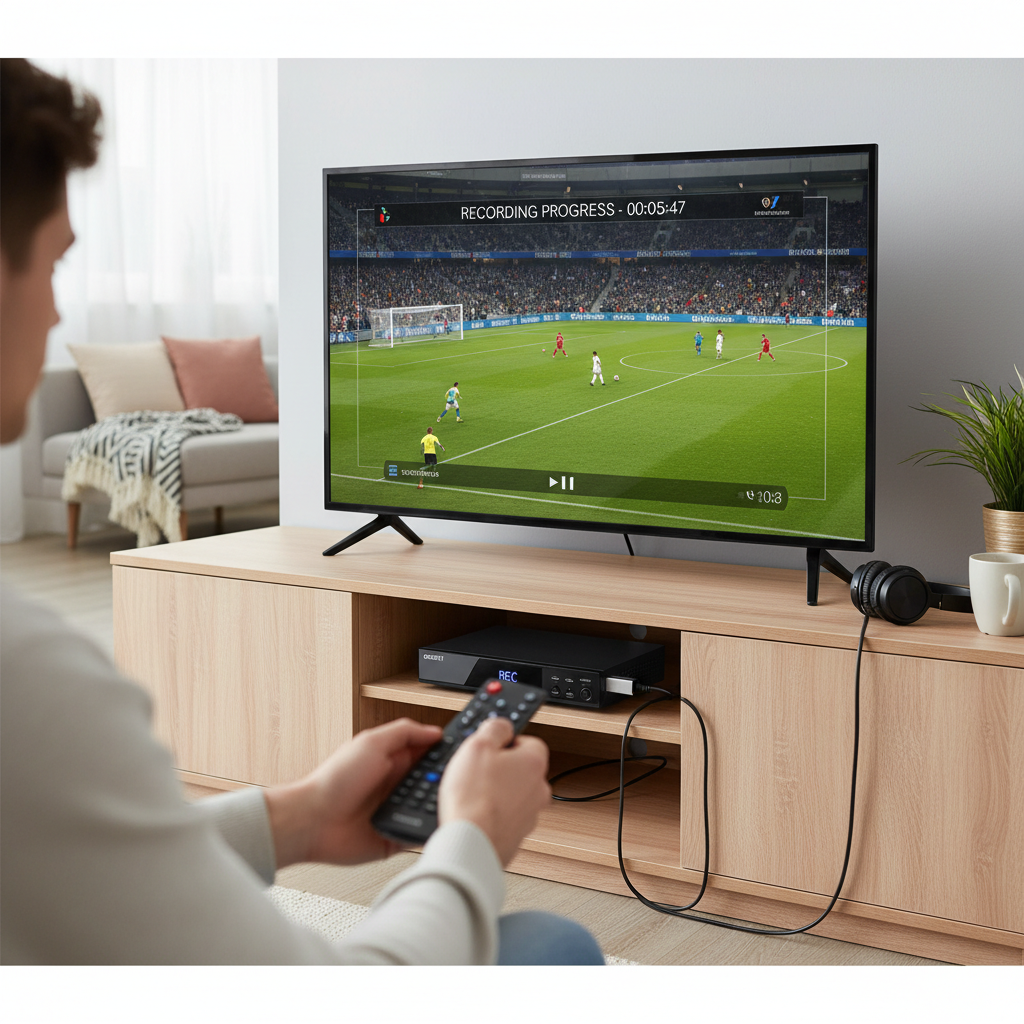
What is DIY USB TV Recording?
|
Our Picks for the Best Digital receiver in 2026
As an Amazon Associate I earn from qualifying purchases.
|
||
| Num | Product | Action |
|---|---|---|
| 1 | Sony STRDH190 2-ch Home Stereo Receiver with Phono Inputs & Bluetooth Black |

|
| 2 | Pyle 4-Channel Audio Amplifier with Bluetooth - Home Stereo Receiver w/ 500W Max Power - Commercial or Karaoke - Dual Mic Input with Echo, Vol, Talk-Over - AUX In - Sub Out - USB-A MP3 Player, AM/FM |
|
| 3 | Donner Stereo Audio Amplifier, 600W Peak 2 Channel Receiver with Bluetooth 5.3, Phono, Optical, Coaxial, USB, FM, 2 Mic-in, Aux, RCA Input for Home, Karaoke, Theater Speakers, MAMP2 |
|
| 4 | Daakro AK45 Stereo Audio Amplifier,300W Home 2 Channel Wireless Bluetooth 5.0 Power Amplifier System, Home Amplifiers FM Radio, USB, SD Card, with Remote Control Home Theater Audio Stereo System |
|
| 5 | Denon AVR-X1700H 7.2 Channel AV Receiver - 80W/Channel, Advanced 8K HDMI Video w/eARC, Dolby Atmos, DTS:X, Built-in HEOS, Amazon Alexa Voice Control |
|
| 6 | Pyle 200W Stereo Power Amplifier with Bluetooth - Dual Channel Audio Receiver - LED Display - RCA - USB - SD - MIC IN - FM Radio - AUX Input - Perfect for Home & Computer Audio - PDA29BU.5 |
|
| 7 | Pyle Home Stereo Receiver with Bluetooth - 4 Channel Amplifier, 800 Watt Max, USB-A Input w MP3 Player, Easy Karaoke Setup with Mic Vol, Reverb and Delay, RCA in/Out, SD Card, FM Radio - PDA77BU |
|
| 8 | Denon AVR-S570BT AV Receiver 5.2 Channel 8K Ultra HD Audio & Video, Stereo Receivers, Denon AVR Wireless Streaming Bluetooth, (4) 8K HDMI Inputs, eARC, HD Setup Assistant |
|
| 9 | YAMAHA R-S202BL Stereo Receiver |
|
| 10 | Digital TV Converter Box, ATSC Tv Tuner - ZJBOX for Analog HDTV Live 1080P with Recording&Playback,HDMI Output, Timer Setting Tuner Function Digital Channel Free |
|
DIY USB TV recording involves leveraging the built-in Personal Video Recorder (PVR) functionality found in many modern televisions and standalone digital receivers to save broadcast content directly onto a connected USB storage device. This method offers a convenient and affordable alternative to dedicated, often expensive, DVR boxes. The core components for this setup typically include a PVR-ready TV or a compatible digital receiver, a suitable USB drive, and a stable broadcast signal.
TV/Receiver Capabilities for USB Recording
The ability to record TV to a USB drive largely depends on your equipment. Many contemporary smart TVs, particularly those sold in Europe, come equipped with this feature. You might see indicators like “USB Rec/Play,” “USB Recording,” “PVR,” or “DVR” logos on your TV or in its manual. Prominent brands such as Samsung, LG, Sony, and Hisense have integrated this functionality into many of their mid-range to high-end models since around 2010. The primary advantage of using a PVR-ready TV is the integrated experience, requiring no additional external boxes. However, a common limitation is that recordings are often tied to the specific TV they were made on and cannot be played back on other devices or computers. Furthermore, basic TV PVR functions typically allow recording only the channel you are currently watching, though some higher-end models with twin tuners might offer more flexibility.
Alternatively, if your TV lacks built-in PVR, standalone digital receivers for various broadcast standards—like DVB-T2 (terrestrial), DVB-S2 (satellite), or DVB-C (cable)—often include USB recording ports. These receivers are excellent for upgrading older non-PVR televisions or for specific tuner requirements. While they add another piece of hardware and remote control, they provide dedicated recording capabilities.
Prerequisites for DIY USB Recording
Before you dive into recording, a few prerequisites ensure a smooth experience:
- Compatible TV or Receiver: Your device must explicitly support USB recording. Check your user manual or the manufacturer’s website for PVR or DVR features.
- Digital TV Channels: USB recording typically functions only with digital broadcast signals, not older analog channels.
- USB Storage Device: You’ll need an appropriate USB drive, which we’ll discuss in detail next.
- Broadcast Signal: A stable signal from an antenna, satellite dish, or cable connection is essential for clear recordings.
Essential Factors for Successful USB Recording
Compatibility Checklist
To maximize your chances of successful DIY USB recording, consider these compatibility points:
- TV/Receiver Support: Always confirm your television or digital receiver has active PVR functionality. Look for dedicated “USB Recording” or “HDD” ports, which often signify PVR capability.
- Broadcast Standard: If using a standalone receiver, ensure it matches your region’s broadcast standard (e.g., DVB-T2 for terrestrial, DVB-S2 for satellite, DVB-C for cable).
- Digital Channels Only: Remember that USB recording is generally enabled only for digital television channels.
- Region-Specific Restrictions: Be aware that in some regions, notably the US, USB recording features on TVs are often disabled due to legal or licensing issues, unlike in many European markets.
Choosing the Right USB Storage
The choice of USB storage device is crucial for reliable recording.
- USB Hard Drives (HDD) vs. Flash Drives: While USB flash drives can work for short recordings, external USB Hard Disk Drives (HDDs) are generally recommended for their superior reliability, larger capacity, and sustained performance, especially for frequent or extended recording sessions. 2.5-inch HDDs are often preferred due to their lower power consumption and quieter operation.
- Capacity: For casual recording, a 32GB USB stick might suffice. However, for extensive HD or 4K content, a 1TB or larger external HDD is highly recommended. As a general guideline, standard definition (SD) digital video can consume around 1GB per minute, while high-definition (HD) or 4K content will require significantly more storage, roughly 65GB per hour for uncompressed digital video.
- Speed: A drive with adequate read/write speeds is critical for smooth, uninterrupted recording. For USB 2.0 HDDs, a minimum of 34 Mbps read and 52 Mbps write speed is often required. Opting for a USB 3.0 drive, even if your TV only has USB 2.0 ports, can provide a performance buffer and better future-proofing.
- Dedicated Use & Formatting: When you connect a new USB drive for recording, your TV or receiver will typically prompt you to format it. This process will erase all existing data and format the drive into a proprietary system specific to that device. This also means recordings are usually “locked” to the recording device and won’t play on other TVs or computers. Therefore, it’s best to use a dedicated USB drive solely for your TV recordings.
Step-by-Step Guide: Setting Up and Recording
1. Preparing Your USB Drive
Before you begin, ensure your USB drive is ready:
- Backup Data: If your USB drive contains any valuable files, transfer them to another device immediately. The formatting process is destructive and irreversible.
- Connect the Drive: Plug your chosen USB HDD or flash drive into an available USB port on your TV or digital receiver. Some devices have a specific “USB Recording” or “HDD” port, which might be indicated in your manual or by a label.
2. Initializing the USB Drive
Once connected, the drive needs to be prepared for recording:
- Automatic Prompt: Many smart TVs and receivers will automatically detect the new USB device and display an on-screen prompt asking if you wish to format it for PVR use. Follow the on-screen instructions.
- Manual Formatting: If no prompt appears, you’ll need to navigate through your TV’s or receiver’s menu. Look for sections like “Settings,” “System,” “PVR Setup,” or “Storage” and find an option to “Format HDD” or “Initialize USB Device.”
- Performance Test: Some devices may conduct a quick performance test on your USB drive to ensure it meets the minimum speed requirements for reliable recording. Select “Proceed” if prompted.
3. Recording a Program
With your USB drive formatted and ready, you can now start recording:
- Instant Recording: The simplest way to record is to press the “Record” (Rec) button on your TV or receiver’s remote control while watching the desired live program. This will usually start recording the channel you are currently viewing immediately.
- Scheduled Recording via EPG: For future programs, use the Electronic Program Guide (EPG), often accessible via a “Guide” or “EPG” button on your remote.
- Navigate through the program listings to find the show you want to record.
- Select the program and choose the “Schedule Recording” or “Timer Recording” option. Many devices allow you to set recordings for once, daily, or weekly repeats. This feature often works even when the TV is off or in standby.
- Timeshift (Pause Live TV): Most PVR-enabled devices also offer a “Timeshift” function. This allows you to pause live television, grab a snack, and then resume watching from where you left off. The TV temporarily records the live broadcast to your USB drive, letting you rewind or fast-forward through the buffered content. Simply press the “Pause” button during live viewing to activate.
“The magic of USB recording lies in its simplicity; it transforms your passive viewing into an active, on-demand experience, ensuring you never miss a moment of your favorite shows.” – Admin, reviewapr.com
Troubleshooting and Best Practices
Even with the right setup, you might encounter occasional hiccups. Here’s how to address common issues and ensure optimal performance.
Common Recording Issues
- “USB not recognized” or “Device not supported”: This often indicates an issue with drive compatibility, formatting, or the USB port itself.
- Solution: Double-check if your TV supports the specific type of USB drive (HDD vs. flash). Try a different USB port, particularly one labeled “HDD” if available. Ensure the drive has been formatted by the TV and not on a computer. If issues persist, the drive may not meet the TV’s speed requirements.
- “Recording failed” or “Low quality recording”: These problems typically stem from insufficient USB drive performance or an unstable signal.
- Solution: Use a faster, higher-quality USB drive. Ensure your broadcast signal is strong and clear. If recording via an antenna, check its positioning.
- Playback restrictions: A frequent point of confusion is that recordings made on one TV or receiver cannot be played on another device or computer.
- Solution: This is an inherent limitation due to proprietary formatting and digital rights management. There’s no workaround for this on standard TV/receiver PVRs.
Tips for Optimal DIY USB Recording
- Dedicated, High-Quality Drive: Invest in a reliable, high-speed USB 3.0 external hard drive. This ensures smooth recording and playback and prolongs the life of the drive, even if your TV’s USB ports are 2.0.
- Regular Firmware Updates: Always keep your television or digital receiver’s software updated. Manufacturers often release updates that improve PVR functionality, add features, and fix bugs.
- Avoid Disconnecting During Recording: Never unplug the USB drive while a recording is in progress or during Timeshift. Safely “eject” the drive via your TV’s menu when not in use, if the option is available.
- Monitor Storage: Periodically check the available space on your USB drive. Delete old or unwanted recordings to prevent the drive from becoming full, which could lead to recording failures.
“To truly master DIY TV recording, treat your USB drive as an extension of your television—a dedicated tool for preserving the moments you don’t want to miss.” – Expert Technician, reviewapr.com
Conclusion
Recording live TV to a USB drive is a straightforward and rewarding DIY project that puts you in control of your entertainment schedule. By understanding the capabilities of your TV or digital receiver, choosing the right USB storage, and following simple setup and recording steps, you can effortlessly capture your favorite programs. While there are some limitations, such as proprietary formatting, the convenience of pausing live TV or building a personal library of shows makes this a valuable feature for any home.
Ready to take control of your TV viewing? Connect that USB drive, explore your TV’s PVR settings, and start building your personalized content library today! What shows will you record first?
Frequently Asked Questions
What kind of USB drive do I need for TV recording?
For TV recording, a USB external hard drive (HDD) is generally recommended over a flash drive, particularly a 2.5-inch model for its balance of power and quiet operation. It should have sufficient capacity (32GB-1TB+) and meet speed requirements, typically USB 2.0/5400 RPM with minimum read/write speeds for smooth operation.
Can I record encrypted channels to a USB drive?
Generally, no. USB recording functionality on TVs and basic digital receivers is typically designed for free-to-air (FTA) digital channels. Encrypted or pay-TV channels usually require proprietary decoders or dedicated DVRs provided by your service provider, preventing recording to generic USB drives due to digital rights management (DRM).
Why is my TV not recognizing my USB drive for recording?
Several reasons could cause this, including the USB drive not being formatted correctly by the TV, insufficient speed or capacity of the drive, or the TV simply not supporting that particular drive type or brand. Ensure your TV is PVR-enabled and try formatting the drive through the TV’s menu.
How much recording time can a 64GB USB drive hold?
The recording time on a 64GB USB drive varies greatly depending on the video quality (SD, HD, 4K) and compression. For standard definition (SD) content, you might get many hours, potentially over 60 hours at very low bitrates. For high-definition (HD) content, it could range from 10-20 hours, while 4K content will consume space much faster, potentially only a few hours. Digital video at standard definition (SD) uses about 13GB per hour, or 65GB per hour for uncompressed digital video.
Do I need a special digital receiver for USB recording?
If your TV does not have built-in PVR functionality, you will need a digital receiver that supports USB recording. These receivers are available for different broadcast standards like DVB-T2 (terrestrial), DVB-S2 (satellite), and DVB-C (cable), and typically feature a USB port for connecting an external storage device.